

In this new article I start a series with several tips and tricks involving the use of Kubernetes as a solution for orchestration of Docker containers.
Docker and Kubernetes are among the most popular topics in the world of containers lately. An exciting topic that opens up a lot of possibilities to describe a new era of applications. And if we’re talking about micro-services, there’s no doubt that Docker Kubernetes will come in.
ASP.NET Core:
It’s easy to publish, host, run, and dockerize an ASPNET Core application. In this post, I will provide a general overview on how to dockerize a WEB API step by step.
Download Net 7.0 Framework : https://dotnet.microsoft.com/en-us/download/dotnet/7.0
Docker:
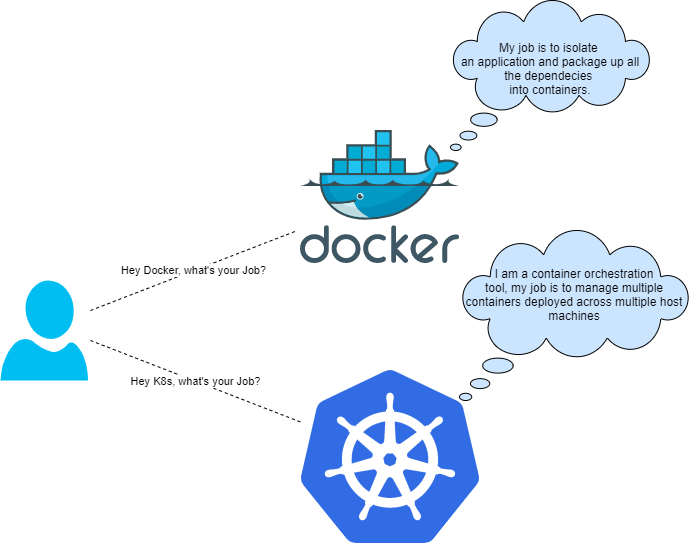
Docker is a container technology. It is a tool that makes it easier to build, deploy, and run your applications using containers. You can liken Docker to virtual machines, but instead of running multiple applications on the same Linux kernel, you can only run the applications you have written with the applications they need. You can also run applications that need different operating systems on a Linux host. In this way, the resource consumption you will use for your applications is reduced and it works more efficiently. One of the best features of Docker is that it is open source. This means that you can add the features you need to the source code. By the way, the reason for explaining Docker is that we will use Docker as the runtime engine for Kubernetes.
To Install Docker Desktop, Download: https://www.docker.com/products/docker-desktop/
Kubernetes:
Imagine you have multiple containers with Docker. Kubernetes is the answer to the question of how to manage them. Kubernetes is an open source container orchestration tool that enables automatic scaling, management, and deployment of containers.
Install Visual Studio Code to create a Web API project. Download: https://code.visualstudio.com/download
Postman will be used to check our endpoints. Download: https://www.postman.com/
Lets start…
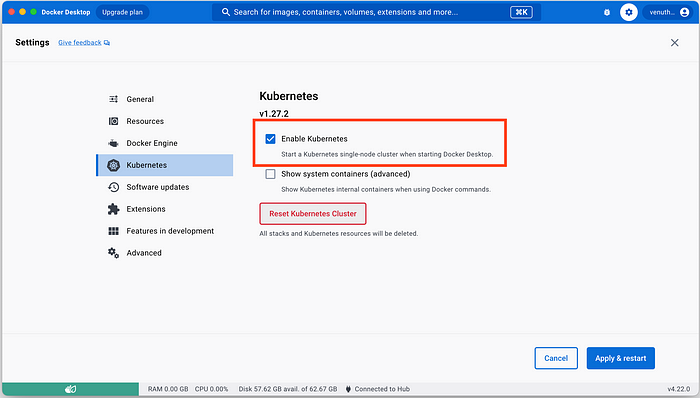
The initial step is to enable Kubernetes on Docker Desktop. It’s disabled by default. Enabling is required like the screenshot below.
Next, let’s create our API project in VS Code. So, let’s run the following command from the VS Code terminal.dotnet new webapi -n <project_name>
Like this ..
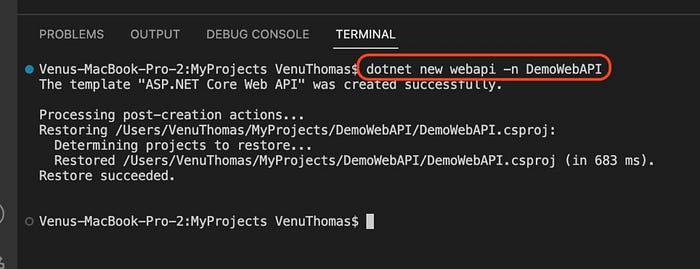
When this command is executed, the project template generates an WeatherForecast API.
We can now build and run our Web API project:dotnet build
dotnet run
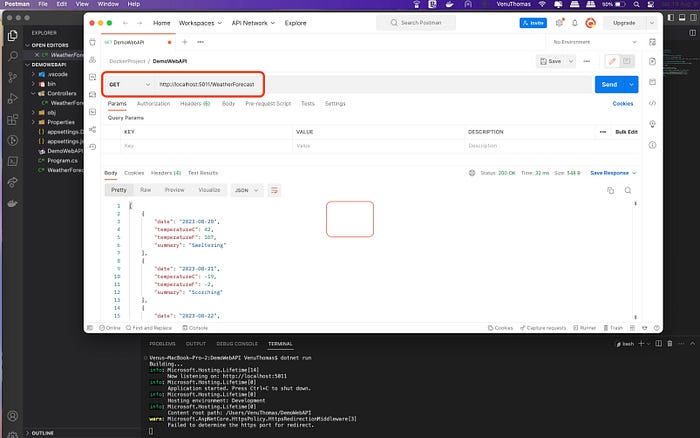
You should have an output simillar to this:
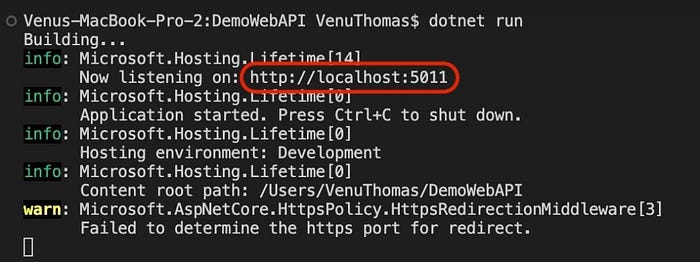
Access it in Postman using the URL listed above http://localhost:5011/WeatherForecast
Sample API is done! and now next step is Create a Dockerfile file for that new API project.
A Dockerfile is a plain text file that contains a set of instructions for building a Docker image. So, You must create a Dockerfile. For example:FROM mcr.microsoft.com/dotnet/aspnet:7.0 AS base
WORKDIR /app
EXPOSE 80
EXPOSE 443
FROM mcr.microsoft.com/dotnet/sdk:7.0 AS build
WORKDIR /src
COPY *.csproj ./
RUN dotnet restore
COPY . .
RUN dotnet build -c Release -o /app/build
FROM build AS publish
RUN dotnet publish -c Release -o /app/publish /p:UseAppHost=false
FROM base AS final
WORKDIR /app
COPY –from=publish /app/publish .
ENTRYPOINT [“dotnet”, “DemoWebAPI.dll”]
looks like…
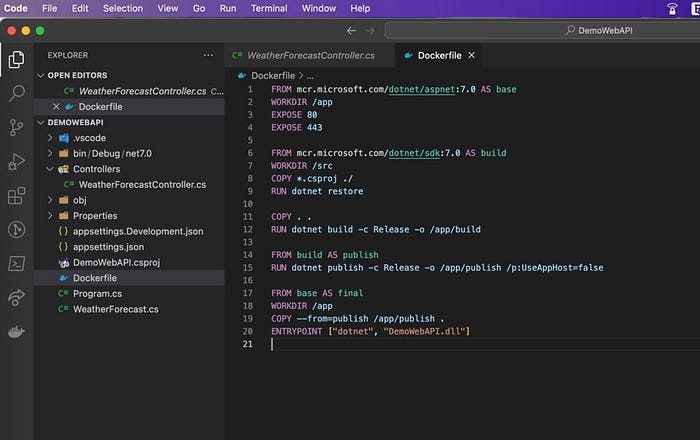
The instructions for building a Docker image for an ASP.NET Core application in NET 7 are contained in this Dockerfile. It consists of stages, the stages in the Dockerfile are defined using the “FROM” instruction and each stage can have its own set of additional instructions to build the final image.
In the Dockerfiles, you can find some common instructions:
- FROM: The base image that will be used to build the new image is specified in the first line of any Dockerfile.
- COPY: By following this instruction, files are copied from the host to the container.
- WORKDIR: The working directory in the container is set by this instruction that will execute the following instructions.
- RUN: During the image construction, this instruction executes commands inside the container.
- EXPOSE: The ports that will be exposed in the container are specified in this instruction.
- CMD: The command that will be executed when the container is started is specified in this instruction.
- ENTRYPOINT: This instruction specifies the command that will be performed when the container is launched, but also allows arguments to be transmitted to the container.
- ENV: Environment variables are set in the container by this instruction.
A breakdown of how each step works is as follows:
- base: In this stage, the base image mcr.microsoft.com/dotnet/aspnet:7.0 is used to set the working directory to /app. The app will use ports 80 and 443, which are exposed by it, to listen for incoming requests.
FROM mcr.microsoft.com/dotnet/aspnet:7.0 AS base
WORKDIR /app
EXPOSE 80
EXPOSE 443
2. build: In this stage, the base image mcr.microsoft.com/dotnet/sdk:7.0 is used and the working directory is set to /src. The DemoWebAPI.csproj file is copied into the container and the necessary dependencies are restored by it. After that, copy all the project files to the bin and set the working directory to /src/DemoWebAPI. At last, it builds the project in Release mode and sends the output to /app/build.FROM mcr.microsoft.com/dotnet/sdk:7.0 AS build
WORKDIR /src
COPY *.csproj ./
RUN dotnet restore
COPY . .
RUN dotnet build -c Release -o /app/build
3. publish — The base image for this stage is the output of the previous build stage. Sets /app as the working directory and publishes the project in publishing mode to /app/publish. To avoid generating a default application host in a containerized environment, the /p:UseAppHost=false argument is used.FROM build AS publish
RUN dotnet publish -c Release -o /app/publish /p:UseAppHost=false
4. final: This step starts with the “base” step as a base image and defines the working directory in/app. The result of the publication stage should be copied into the container. Lastly, configure the entry point for the container in dotnet SampleWebApi.dll, which is the command that initiates the application.FROM base AS final
WORKDIR /app
COPY –from=publish /app/publish .
ENTRYPOINT [“dotnet”, “DemoWebAPI.dll”]
Create a Docker image from a Dockerfile:
In order to produce a docker image, execute this docker file:docker build -t <image_name>:<tag> -f <docker_file_name> .
Let’s break down the command:
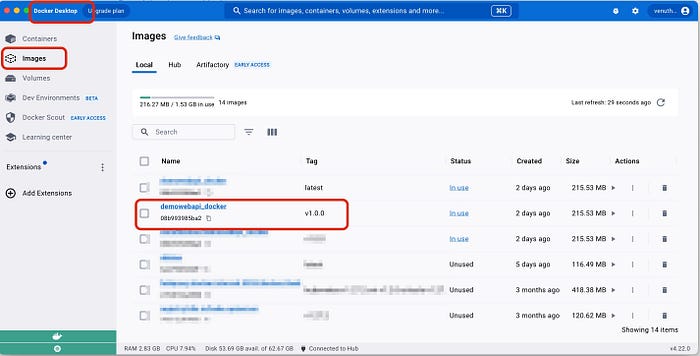
- -t <image_name>:<tag>: By using this option, the name with tag of the image to be created can be specified. In this case, the name of the image will be ‘demowebapi_docker’ and tag will be ‘v1.0.0’.
- -f <docker_file_name>: The Dockerfile file that will be utilized for building the image is specified by this option. In this case, the file is called ‘Dockerfile’.
- . : The end point defines the directory for the construction context. That is, it is the directory where the Dockerfile file and any other file that needs to be copied to the container will be looked for. The point signifies that the Dockerfile and any other necessary files are located in the current directory.
Command looks like…

For detailed information: https://learn.microsoft.com/en-us/dotnet/core/docker/build-container
Run and Test Docker Image:
Now, you have a docker image. This image can be found under the Images tab on Docker Desktop.
The following command can be used when running this image:docker run -it -p <port>:80 –name <container_name> <image_name>:<tag>
Let’s break down the command:
- docker run: initiates a new container that is based on the image specified
- – it: Attaches a terminal to the container to make it interactive.
- . p <port>:80 : The host machine assigns port <port> to port 80 inside the container.
- -name <container_name> : assigns a name to the container.
- <image_name>:<tag> : The Docker image that will be utilized for the container is named as this.
Command looks like…

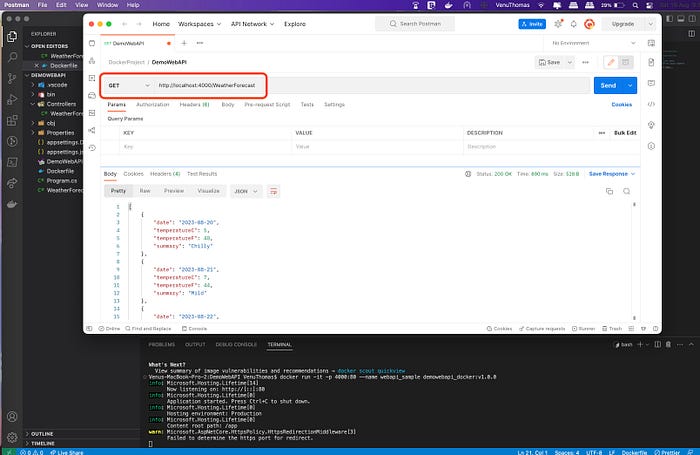
In general, this command is useful for quickly activating an ASP.NET Core application in a container that can be accessed from the host machine via a web browser or postman like below screenshot.
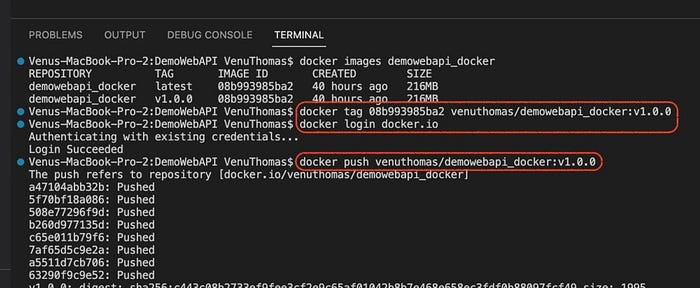
Pushing Docker Image to Docker Hub:
The image we created needs to be pushed to Docker hub. Otherwise, there will be an issue with the next step in the Kubernetes deployment process.docker tag <image_id> <docker_hub_username>/<image_name>:<tag>
docker login docker.io
docker push <docker_hub_username>/<image_name>:<tag>
Command looks like..
Deploy Web API project to Kubernetes:
The docker image we created earlier is what we use at this stage. If the Docker container is currently running, it can be stopped using the command belowdocker stop <container_name>
Two stages are involved in deploying the API project to Kubernetes. Operations on Kubernetes are carried out through the Kubectl command.
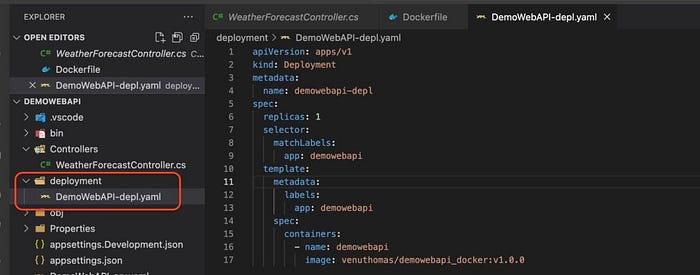
- Creating deployment file: The Kubernetes deployment file is a YAML file that defines the desired deployment state, including the number of pod replicas, container image, and other configurations. The following is a sample deployment file for the Web API project.
apiVersion: apps/v1
kind: Deployment
metadata:
name: demowebapi-depl
spec:
replicas: 1
selector:
matchLabels:
app: demowebapi
template:
metadata:
labels:
app: demowebapi
spec:
containers:
– name: demowebapi
image: venuthomas/demowebapi_docker:v1.0.0
I have created deployment yaml file under ‘deployment’ folder as below screenshot.
For detailed information: https://kubernetes.io/docs/concepts/workloads/controllers/deployment/
Apply the deployment to Kubernetes: In your command-line interface, run the following command to apply the deployment YAML file:kubectl apply -f <deployment_yaml_file>
Command looks like…

Now, We are currently running a deployment on a single pod. The Deployment YAML file defines one replica, resulting in one pod and one deployment. In other words, the number of deployment and pod is proportional to the number of replicas.
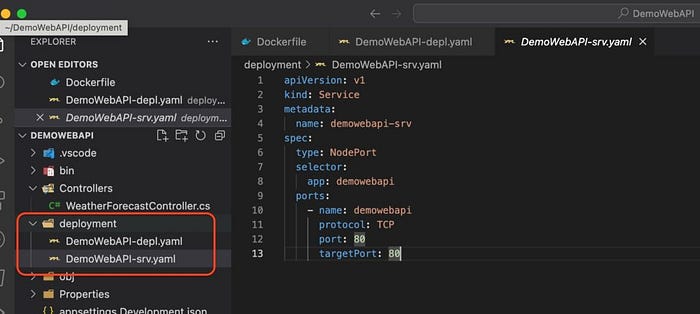
Enabling the Deployment to communicate with the outside world: To expose a service outside of the cluster and make it accessible from the internet or other external networks, we will create a NodePort in Kubernetes. An example of a Node Port YAML file is below.apiVersion: v1
kind: Service
metadata:
name: demowebapi-srv
spec:
type: NodePort
selector:
app: demowebapi
ports:
– name: demowebapi
protocol: TCP
port: 80
targetPort: 80
This file also created under ‘deployment’ folder.
Node Port is created with the following command:kubectl apply -f <node_port_yaml_file>
Command looks like…

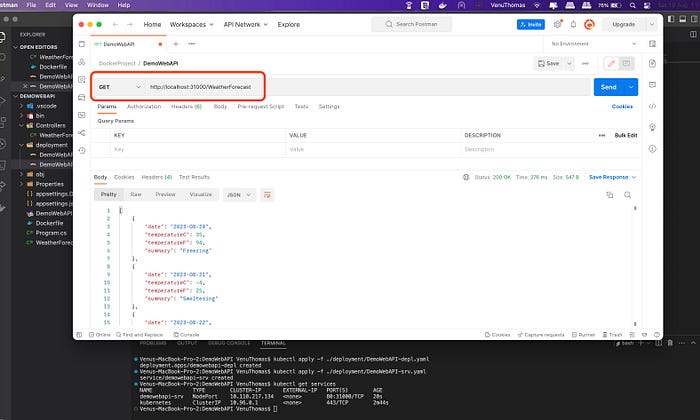
To communicate with our web API, we must obtain the Kubernetes internal port number after the node port is created. You can retrieve the external IP address of the service using the following command:kubectl get services
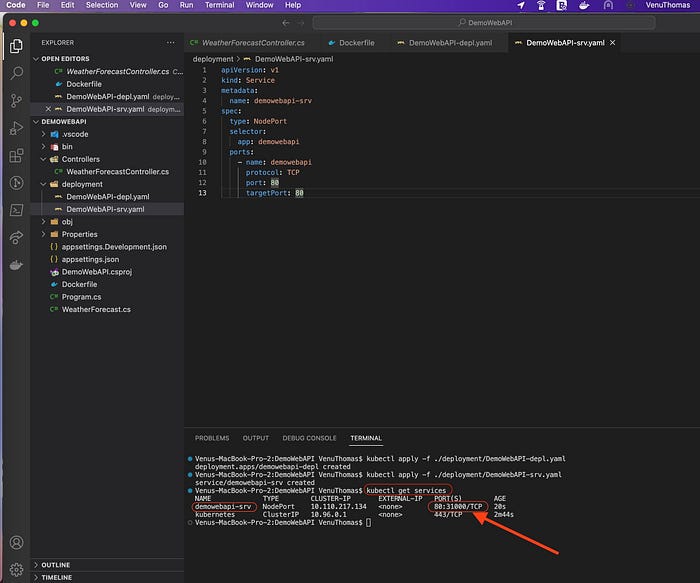
In above pic, Search for the port number in the PORT(S) column that is associated with your demowebapi-srv. The node port will fall in the range 30000–32767 (or as shown in the nodePort field). Your API can be accessed by using the IP address of any worker node in your cluster and the Node Port. For example: http://<node-ip>:<node-port>/WeatherForecast
As can be seen from the screenshot, the port number of the deployment is 31000. Now the new web API project is http://localhost:31000/WeatherForecast . You can access it via browser or postman.
If you have achieved this stage, you will have a Web API docker image that is currently running on Kubernetes. So you can take full advantage of Docker and Kubernetes!.
Thanks for reading this article! ❤️ Hope you like it.
If you would like to ask me questions, please feel free! I’ll always have my mailbox open. Whether you have a question or would like to simply say hello. I will do my utmost to respond!